If you looking forward to making a free Remote Desktop Protocol service by Amazon AWS, then in today’s article we were gonna learn “How To Get Free RDP From Amazon AWS tier”?
Now, these days this is the most demanding topic over the internet, especially in third world countries, where most of the services are not available. In such conditions, these countries’ IT geeks take a between way where they use computer access of their desired country even staying at home.
Removing this hustle by creating free sources of IPs (Internet Protocol) of several countries, through this demanding tutorial.
All you need to just grab some of your favourite food before gonna dive into the article because the article going a little long and interesting for you, which must be making you able to create free RDP through Amazon Cloud Computing services.
What Is RDP?
In simple words, RDP is utilized to make connections with virtual or cloud devices, through our own computers at home. Generally, we try these remote desktop computers for fast internet connectivity, huge storage and high operating performance.
Why We Need Remote Desktop Protocol?
In the countries that still don’t have legal PayPal access, those states always feel in need of legal PayPal account control.
In simple words, many countries did not have on the list of Adsense earning programs, still a lot of states for not added to the list of “Facebook Monetization Program“.
Sometimes different websites ban in Pakistan by PTA, for making unblocking these sites people also used RDP or IP changers.
What Is Amazon AWS?
AWS is launched in 2006. AWS stands for “Amazon Web Services”, it offers several solutions and tools which could be used in more than 190 countries.
Things Required Before Making AWS RDP
- Gmail Account
- Visa Card/Debit Card/Payoneer
- Minimum of 1 dollar in the account
Check: How To Create Gmail Account?
Offer Types Of Amazon AWS
- Free Trials
- 12 Months Free
- Always Free
How To Get Free RDP From Amazon AWS Tier Complete Method?
- Go to Google
- Type AWS Amazon in the Google search bar
- Follow the official link address of Amazon AWS Account Free Signup
- This URL takes you to the AWS Free Tier
- Now click on “Create A Free Account”
- Now you have to enter your signup details as follows
- Email Address
- Password
- Confirm Password
- Choose AWS account name
- Click on the continue of step 1 of 5
- Enter Captcha
- Now after continuing this page required your “Personal Information” and hit continue of step 2 of 5
- Now enter your “Billing Information” and click on continue step 3 of 5
- Now here you have to “Confirm Your Identity” and click on “Send SMS”
- Put the verification code which you just received on your cell number and press the button to continue to step 4 of 5
- Now you have to choose “AWS Support Plan” recommended to select the “Basic Support Free” program
- Click “Complete Sign Up“
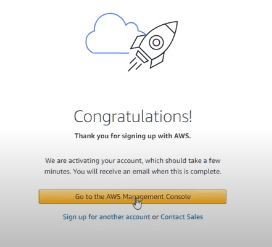
Once you have done the whole process, now you get this “Congratulations” notification. So the next step is to click on “Go To The Management Console” as shown in the above image.
After launching “Go To The Management Console” now the next window is demanding you to enter your “Sign In” details as follows.
- Select Root User
- Enter your registered email as “Root User Email Address“
- Now hit the “Next” button
- Enter the “Captcha” code and press the “Submit” button
- Enter your “Password” and click the “Sign In” box
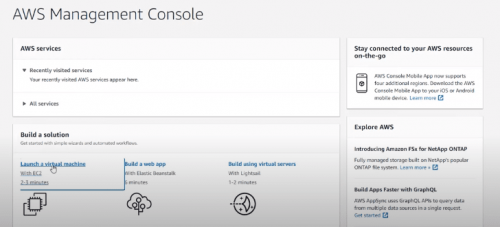
Now you were successfully logged in to your newly created AWS account. You see a new dashboard titled “AWS Management Console“. Here you would see a lot of options, but no need to worry you have to just follow the guide.
From this multi-optioned dashboard, you see the “Build A Solution” section. From here just click on the “Lunch A Virtual Machine” option.
Choose An (AMI) Amazon Machine Image
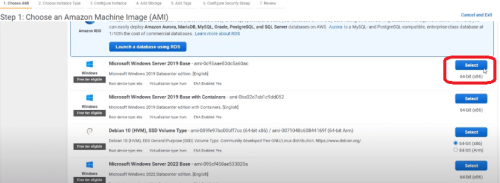
After reaching this page, just checkmark “Free Tier Only” on the left side “Quick Start” section. As you can see in the image below.
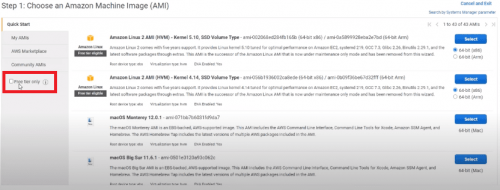
After selecting the free tier only now from the other options you have to select “Microsoft Windows Server 2019 Base” as the downside image make shown clearly.
Choose An Instance Type
After selecting Microsoft Windows Server 2019 Base, now in this option, you have to do nothing and wait for a while till the system automatically creates some instance types. All you need to just click on the “Next: Configure Instance Details“.
Configure Instance Details
When you reach this step, here also you have to do nothing or any changes and just move ahead by clicking “Next: Add Storage“.
Add Storage
In this section again for further configuration click on “Next: Add Tags“.
Add Tags
After reaching add tags area now you were a little far from the final process so just click on “Next Configure Security Group“.
Configure Security Group
You were almost done, go and choose the “Review And Lunch” option on the right bottom.
Review Instance Lunch
So once you reached this section of making Amazon RDP, So nowhere if you click on the blue button of “Lunch” a pop-up window would appear demanding a key pair. So for being you need an existing or new key pair.
How To Create Key Pairs
Now you need to create a new key pair for lunch ahead. So just leave this page as it is here and open it in a new window again “Services” section as in the image below and select “EC2“.
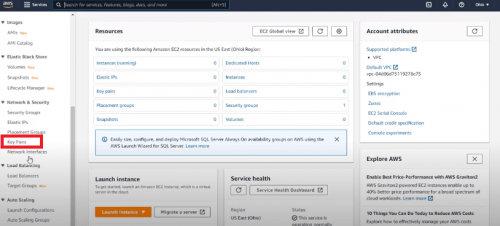
After reaching the EC2 dashboard, now choose “Keypairs” from the “Network & Security” section on the left sidebar of the dashboard. For further details about making Amazon keypairs follow the below points.
- Click on KeyPairs
- Now select the option from the upper right area of the dashboard “Create Key Pair“
- Enter your desired name for the keypair
- Checkmark the “.PEM” from the “Private Key File Formate“
- Now just click on “Create Key Pair“
Once you click on the create key pair a text file is automatically downloaded to your hard drive. You have to make it save properly on your computer.
After creating a key pair now you have to go again to the “Lunch” section and just “Choose An Existing Key Pair” and hit “Lunch Instance” after check-marking the terms and conditions as you see in the screenshot below.
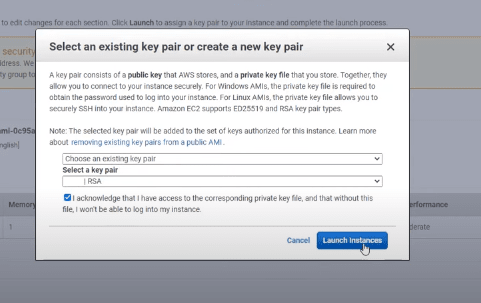
So now you click on “Lunch Instances” after selecting your keypair, you get your “Lunch Status“. Just click on the “View Lunch” button from the right bottom corner. After clicking view lunch wait for a few minutes to be your instance state pending running.

When the “Instance State” status shows running, then you have to checkmark the box on the left below the “Name” section and then click on the “Connect” button from the top. The next window is connected to an instance from here you have to choose “RDP Client” and check the image below.
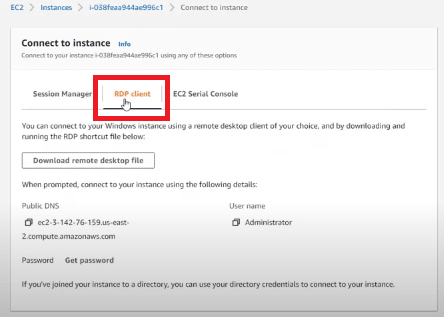
Now your RDP is created, so like in the above picture you see an option for “Download Remote Desktop File“. Just download it. You also see the below information here.
- Public DNS
- User Name
- Password
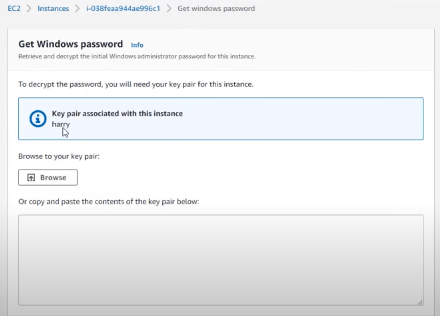
For getting a password just click on “Get Password” and upload the “Key Pair Associated With This Instance” through a browse file from your computer. After uploading the file, click on “Decrypt Password“. So now you would get a password too in your details.
Note: This was the keypair just before we created and downloaded it to our hard drive.
Now your RDP is ready to use you can lunch through the downloaded Remote Desktop Protocole file and enter login details, Cheers!

